• Skip to primary navigation
  • Skip to main content
  • Skip to primary sidebar

The Kitchen Prep Blog

Easy Recipes with a Fresh Twist

  • Home
  • About Dianna
  • Recipe Index
  • Work With Me
    • Disclosure Policy
  • Contact
menu icon
go to homepage
subscribe
search icon
Homepage link
  • Home
  • Recipe Index
  • About Dianna
  • Work With Me
  • Contact
    • Facebook
    • Instagram
    • Pinterest
    • Twitter
  • ×

    Home » Breakfast & Brunch

    Easter Cream Puffs

    Published: Mar 27, 2013 · Modified: May 25, 2021 by thekitchenprep · This post may contain affiliate links ·

    Jump to Recipe Print Recipe

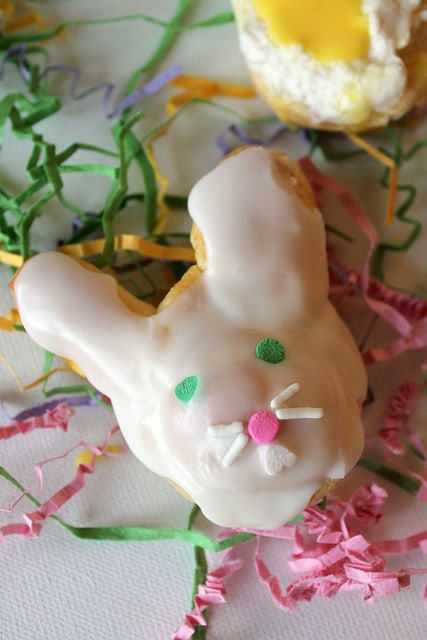
    Easter Cream Puffs! A basic sweet treat is transformed into a cute Easter dessert with the help of a simple glaze and creatively placed sprinkles. Whether you decide to decorate them for springtime or keep them plain, these cream puffs are a delicious addition to dessert buffets.

    These adorable Easter cream puffs are cute little Easter chicks filled with sweet whipped cream and a sweet, creamy glaze

    Yesterday a made a shocking confession over on my Facebook page: I do not enjoy baking fussy things. Things that look like other things. Things that require tedious detail application. Things that make me want to pull my hair out.

    Don't get me wrong... I like looking at intricate and gorgeously crafted treats. I am totally amazed at what some people can create out of food, like the things you will find here, here, and here. I'm just not patient enough to ever be one of those people.

    Every once in a great while, though, I am struck with an unshakable urge to attempt beauteous feats with my baking. It doesn't happen often, but when it does, I can't seem to get it off of my mind until I give it a try. Like this cute Easter dessert...

    These sweet little cream filled Easter cream puffs are filled with a light whipped cream and decorated as adorable little Easter chicks

    I just woke up a few days ago and thought, "I want to make cream puffs that look like chicks." No, really. That's exactly how it happened.

    Ironically, cream puffs are probably one of the easiest things you can make. And I had to go and make them all complicated. Go figure.

    Anyway, the cream puffs themselves are not difficult to make at all. A basic choux {the dough that is used in making cream puffs, eclairs, and gougeres} comes together so quickly it's sort of ridiculous. And dangerous. You can have yummy little cream puffs at your fingertips in less than an hour.

    But cream puff chicks? Yeah, not so much.

    I'm not saying these chicks are the most difficult thing you'll ever make. I'm just saying don't go and decide to make them on a day when you're short on time. Or patience. Or on a day when you've had a lot of caffeine.

    These adorable little Easter chicks are sweet cream-filled cream puffs with a sweet vanilla glaze

    Maybe you'll think it's a hoot to pick little teeny tiny sprinkles out of their container and give these guys sweet little chickie faces. You might even find it amusing and challenging to try to place them evenly on said chickie face so that it doesn't look like chickie was sneaking the sacramental wine during Easter service.
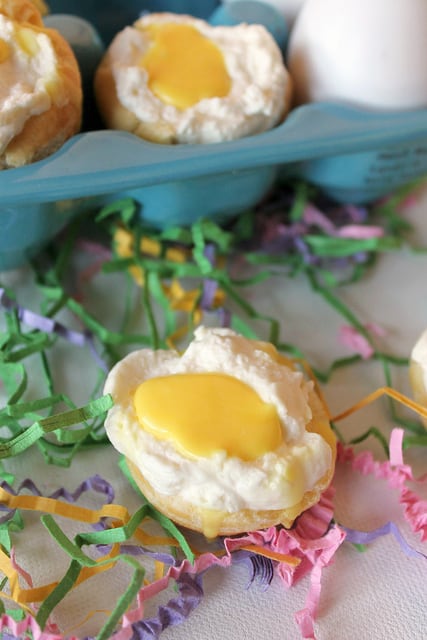
    Or maybe you'll give up after one chickie {like I did} and decide to go the easy route & make "cracked eggs" instead.

    These tasty Easter cream puffs look like mini eggs with light whipped cream and a dollop of sweet vanilla glaze

    To each his own.

    {I also made some bunnies that I thought were sort of frightening looking. I texted a picture of them to my sister and she concurred. Ah, the honesty of family. Ha!}

    Easter bunny cream puffs might not be the cutest looking, but they sure are sweet and tasty!

    Variations

    Choux pastry is quite versatile, so if you don't see yourself setting aside time in your busy day to crank out a flock of chicks, fret not. You can use this same dough recipe to make profiteroles and eclairs, filling them with ice cream, pastry cream or pudding. Another good variation is to flavor the cream with a different flavor extract {almond?}, or zest {lemon?}. The possibilities are truly endless!

    But If You Insist...

    If you read all of the above and still find yourself aching to create some Easter-inspired treats, then I suppose you're the patient type I spoke of earlier and you should be just fine applying microscopic embellishments. Here's how I made mine:

    For Chicks:

    1. Spoon glaze over tops of cream puffs, making sure it runs down over the whole puff. {I sort of like the drippy look but you can be exact if you want.}

    2. Let the glaze set for about 5 minutes before trying to apply eyeballs & beaks. {Trust me, you will be very annoyed if you do not wait.}

    3. Once the glaze is semi-set, carefully place black nonpareils in place for eyes, and orange sprinkle in place for beak. You can use little tweezers or a toothpick to help you finagle them into place, or just get a helper with a steady hand. Let set before serving.

    For "Cracked Eggs":

    1. You will only need half of your filled cream puff for these. Remove the top part of the cream puff {and eat it}.

    2. Make a small "well" in the center of the whipped cream.

    3. Drizzle a small amount of yellow glaze into the well for the appearance of a "yolk".

    4. Let set a bit before serving.

    I've talked all kinds of trash about making this cute Easter dessert, but I hope you know I'm just kidding... these would make a really fun Easter/spring project {for patient people}. And a really delicious treat for everyone else. 🙂

    Little "egg" Easter cream puffs are a simple, sweet dessert that's perfect for the season

    Easter Cream Puffs

    The Kitchen Prep
    These adorable Easter cream puffs are transformed into sweet little Easter chicks. Filled with a light whipped cream and simple glaze, these little chickies are a perfect addition to your Easter buffet.
    Print Recipe Pin Recipe
    Prep Time 30 mins
    Cook Time 25 mins
    Total Time 55 mins
    Course Dessert
    Cuisine American
    Servings 12 servings

    Ingredients
      

    For Choux pastry:

    • 4 tablespoons unsalted butter
    • ¼ cup water
    • ¼ cup milk
    • a pinch of salt
    • ½ cup all purpose flour
    • 2 eggs

    For Filling:

    • ½ cup whipping cream
    • 2 {heaping tablespoons} confectioners' sugar
    • ¼ teaspoon vanilla extract

    For Glaze:

    • 1 cup powdered sugar
    • 2 tablespoons milk or cream {this is not exact you will have to play with the amount to get the right consistency, so add a little bit at a time}
    • 1-2 drops yellow food coloring

    Special Tools: {Not required, but quite helpful}

    • Piping bag & round tip -OR- zip top plastic bag
    • Toothpicks
    • Sprinkles {in orange for beaks} & Nonpareils {the little ball shaped sprinkles}
    • Food coloring {specifically yellow}

    Instructions
     

    • Preheat the oven to 400 degrees. Prepare a large baking sheet with parchment paper or line with a silicone baking mat.
    • In a small pot, bring the butter, milk, water, and salt just to a boil over medium-high heat. {Watch it carefully, dairy is notorious for bubbling over onto stoves!}
    • When it comes to a boil, remove from the burner and add in the flour. Stir, stir, stir with a wooden spoon until a thick paste forms. Return it to the burner and keep stirring until the paste pulls away from the sides of the pot and forms a dough. {This will only take a minute or two.}
    • Transfer the dough to a stand mixer fitted with a paddle attachment. Beat it for a minute or so just to cool it down, then add eggs one at a time, mixing until they are fully incorporated and you have a smooth dough.
    • Scrape the dough into a piping bag fitted with a round tip. {Or you can just use a zip top bag with the tip snipped.} Pipe about 1 ½ inch mounds of dough onto prepared baking sheet. Bake for 18-20 minutes until the mounds are puffed and golden brown. {You may want to tear one open to test and make sure that the middles are not too moist. If you under-bake them they will deflate a little.}
    • Remove the puffs from the baking sheet and cool on a wire rack.
    • Meanwhile, make the filling: Combine all ingredients in a medium bowl. Beat with a hand mixer until a whipped cream with soft peaks forms.

    Fill the puffs:

    • Cut the cream puffs in half with a sharp knife {careful not to smoosh them} and fill with about a tablespoon {or more} of cream filling.

    Make the glaze:

    • Combine sugar and milk or cream {a bit at a time until you get the right consistency} in a small bowl and whisk together until smooth. Add a drop or two of yellow food coloring if you want to make yellow chicks or "egg yolks". Stir until you get an even color. [Tip: In order to "coat" the chicks with a solid color, the glaze will need to be pretty thick. I added a tiny bit of liquid at a time until I had a thick, but pourable consistency that would "cling" to the cream puffs. If you don't make it thick enough, it will form a clearish wash over the puffs.]

    Notes

    Adapted from Martha Stewart Mini Eclair recipe
    See post for specific instructions on how to create chicks & "cracked eggs."
    « Peanut Butter-Stuffed Banana Bread Muffins
    TeaLicious Tea House | Delray Beach, FL »

    Reader Interactions

    Comments

    1. Angie Barrett says

      March 27, 2013 at 7:34 pm

      I totally love these! these are super cute but I have picked out sprinkle by sprinkle for a project and I agree that it's hair ripping fun times. hahaha. But I'm kinda thinking that I was to try it for these babies.

      Reply
    2. Katie says

      March 27, 2013 at 8:31 pm

      OMG! These are so stinking adorable--I too hate baking fussy things. You did way better on this than I would ever do!

      Reply
    3. Jess @ On Sugar Mountain says

      March 27, 2013 at 9:14 pm

      Bahahahaha i think cracked eggs are also adorable versions of cream puffs, though I do love that chick! I'm the same way though; I like no fuss pretty baked things, not goodies that take me hours and lots of profanities to finish. 🙂 But these look adorable!

      Reply
    4. Barbara Bakes says

      March 28, 2013 at 11:41 am

      Such an adorable idea!

      Reply
    5. thekitchenprep says

      March 28, 2013 at 1:03 pm

      Angie - Glad the chicks inspired you to hit the sprinkles once again! 😉 Please let me know if you do make them!

      Katie - Thanks so much! I think you & I have a similar cooking/baking style. And your food always looks gorgeous, fussy or not!

      Jess - Thank you for the kind words! And yes, I'm afraid profanities are definitely part of the fussy baking vocab. 😉

      Barbara - Thank you!

      Reply
    6. Meal Plan Mom (Brenda) says

      March 28, 2013 at 9:34 pm

      The furthest I usually get on fussy baked goods is to pin them and dream about making them until the special occasion has passed. Like these adorable little chicks (although I know I still technically have time to make them). Sometimes I get a wild hare to make some super cute thing like the cutout cookies I made in the shape of my kids' school mascot last year. They were a hit so as these likely are, sometimes it's totally worth it!

      Reply
    7. thekitchenprep says

      March 29, 2013 at 12:02 am

      Brenda - I have a Pinterest board devoted to these type of projects. It is aptly titled, "Adorably Impractical". 😉 I agree that every once in a while, these nit-picky projects are worth it! 🙂

      Reply
    8. lauren @ la petite fashionista says

      March 29, 2013 at 9:44 pm

      these are SO cute! i think my family would be totally impressed if I showed up with them on sunday!

      Reply
    9. Anonymous says

      March 22, 2014 at 2:22 pm

      Why not cut the time in half and use store bought cream puffs from the freezer section??

      Reply
    10. thekitchenprep says

      March 22, 2014 at 3:41 pm

      @Anonymous - I suppose you could! But then I wouldn't have much to write about on a cooking blog, now would I? 😉 If you're a shortcut recipe kinda person, decorating store bought cream puffs would definitely do the trick! Enjoy!

      Reply
    11. oneordinaryday says

      April 17, 2014 at 12:12 am

      LOVE your honesty and sense of humor. 🙂

      Reply
    12. D Liche says

      March 12, 2016 at 5:29 am

      so cute! Easter is fast approaching and this one is perfect 😉

      Reply

    Trackbacks

    1. Coconut Key Lime Pie Coolers says:
      April 6, 2017 at 8:21 pm

      […] really wanted to make something super cute and springy {like these} to start getting in the mood for Easter celebrations, but as usual, time snuck away from me and […]

      Reply

    Leave a Reply Cancel reply

    Your email address will not be published. Required fields are marked *

    Recipe Rating


    Primary Sidebar

    Hi! I'm Dianna. I used to think cooking had to be complicated to be good, so I never considered it "my thing." Now I know that's far from true, and my mission is to create & share easy, mouthwatering recipes - from weeknight dinners to simple bites for entertaining - that anyone can make! Join me in my South Florida kitchen and let's get cooking!

    More about me →

    Popular

    • Fork and knife cutting into a stuffed cubanelle pepper.
      Stuffed Italian-Style Cubanelle Peppers
    • Benedictine Spread for Kentucky Derby in a white bowl with a piece of pumpernickel toast in the foreground slathered with spread.
      Benedictine Spread - A Derby Classic
    • Close up of Italian Easter Cookies on a light blue platter.
      Italian Love Knot Cookies
    • A large skillet filled with Creamy Mushroom & Chicken Sausage Florentine Pasta with a yellow and white striped dish towel underneath.
      Creamy Mushroom & Chicken Sausage Florentine Pasta

    As Seen In

    Footer

    ↑ back to top

    About

    • Privacy Policy
    • Disclosure Policy

    Subscribe

    • Sign Up! and get recipes delivered to your inbox.

    Contact

    • Contact
    • Work with Me

    Copyright © 2023 · The Kitchen Prep ·