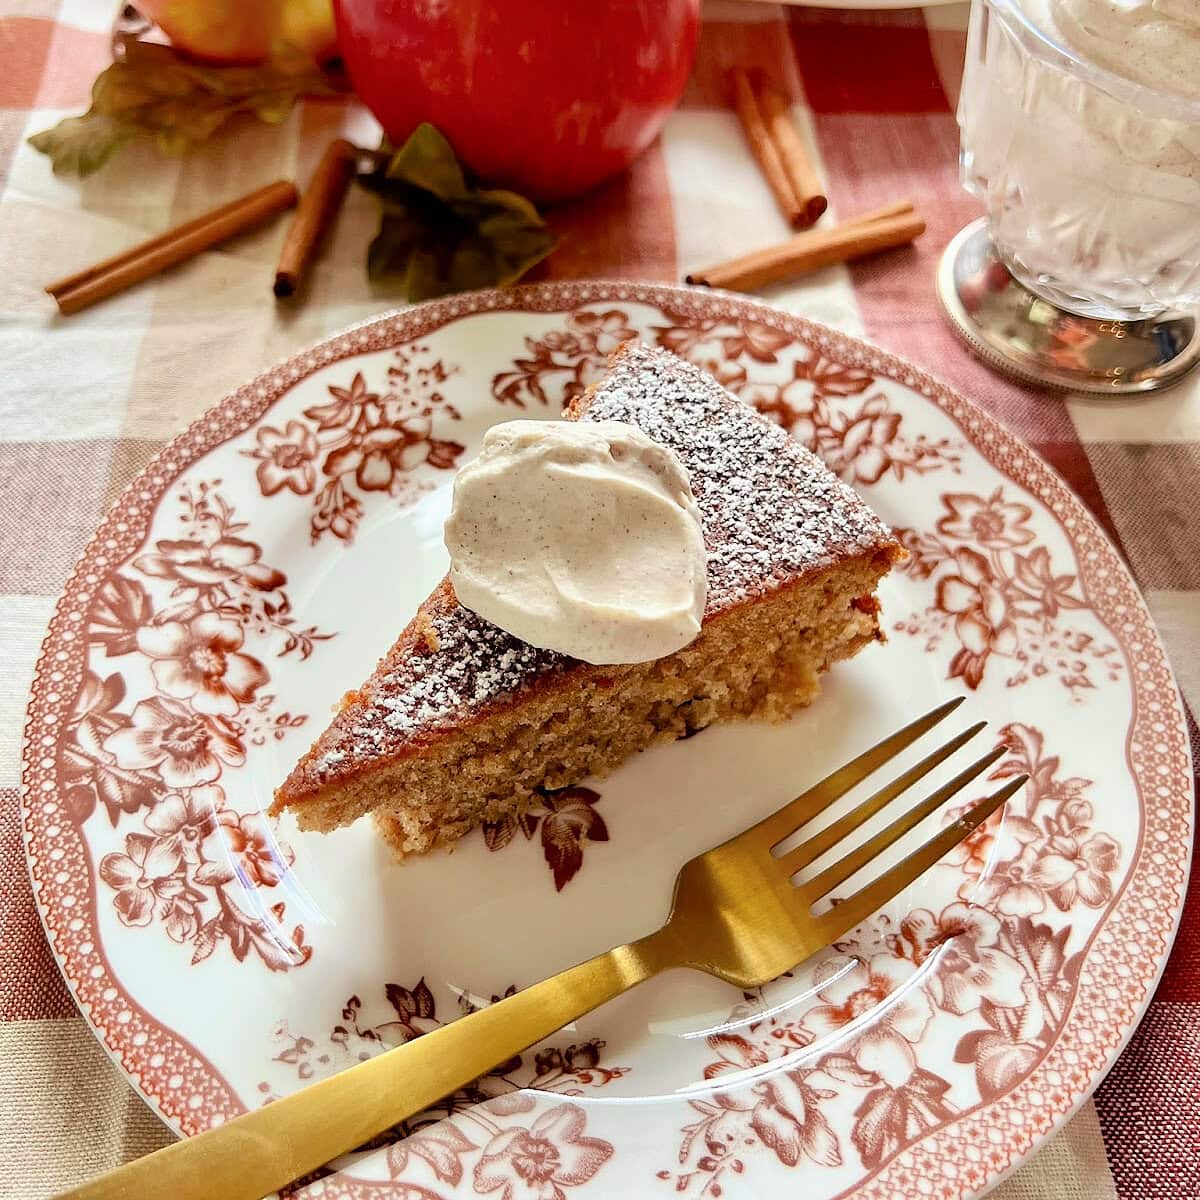
Twinkie Bundt Cake — a homemade version of the beloved classic snack! Sweet vanilla Bundt cake is filled with a tantalizing tunnel of marshmallow crème frosting.

This post may contain affiliate links, which means that, at no extra cost to you, I may earn a small commission if you click a link and purchase an item I’ve recommended. Thanks for your support in running this blog!
For years, this Homemade Twinkie Bundt Cake has been one of the top recipes on my blog thanks to a few viral shares and curiosity getting the most of people over on Pinterest.
I’m finally updating the post to help with my best tips and tricks to making this show-stopping dessert!
Unlike Twinkie Cakes made with layers of store-bought Twinkies or those made with boxed cake mix, this recipe consists of a sweet and tender, “from scratch” style vanilla Bundt cake filled with a tunnel of simple marshmallow crème frosting.
It’s always sure to be a crowd-pleaser and you’ll never tire of watching the surprise on everyone’s face when they discover the sweet secret in the center.
Looking for more delicious Bundt cake recipes? Try my Honey Apple Bundt Cake with Honey Caramel Sauce, Chocolate Chip Banana Bundt Cake or Mini Gluten-Free Lemon Cakes!

Ingredients
- Cake flour. Cake flour gives this cake a soft, tender crumb. If you don’t have cake flour and want to use all-purpose, decrease the amount of flour by 2 tablespoons per cup.
- Baking powder
- Sea salt
- Butter.
- Vanilla extract/vanilla bean paste. I use vanilla bean paste when I want a strong vanilla flavor because it is concentrated and has actual vanilla bean specks in it. If you don’t have vanilla bean paste or don’t want to use it, add another teaspoon of vanilla extract.
- Granulated sugar
- Vegetable oil. Any neutral-tasting oil may be used.
- Eggs. Both whole eggs and egg yolks will be used in this cake, making it extra rich.
- Buttermilk. Using buttermilk in cakes helps make them extra light and fluffy. If you don’ t have buttermilk, you can make your own by pouring 1 tablespoon of vinegar or lemon juice into a liquid measuring cup, then filling with milk to the 1 cup line. Stir and let it sit for 5 minutes before adding to the batter.
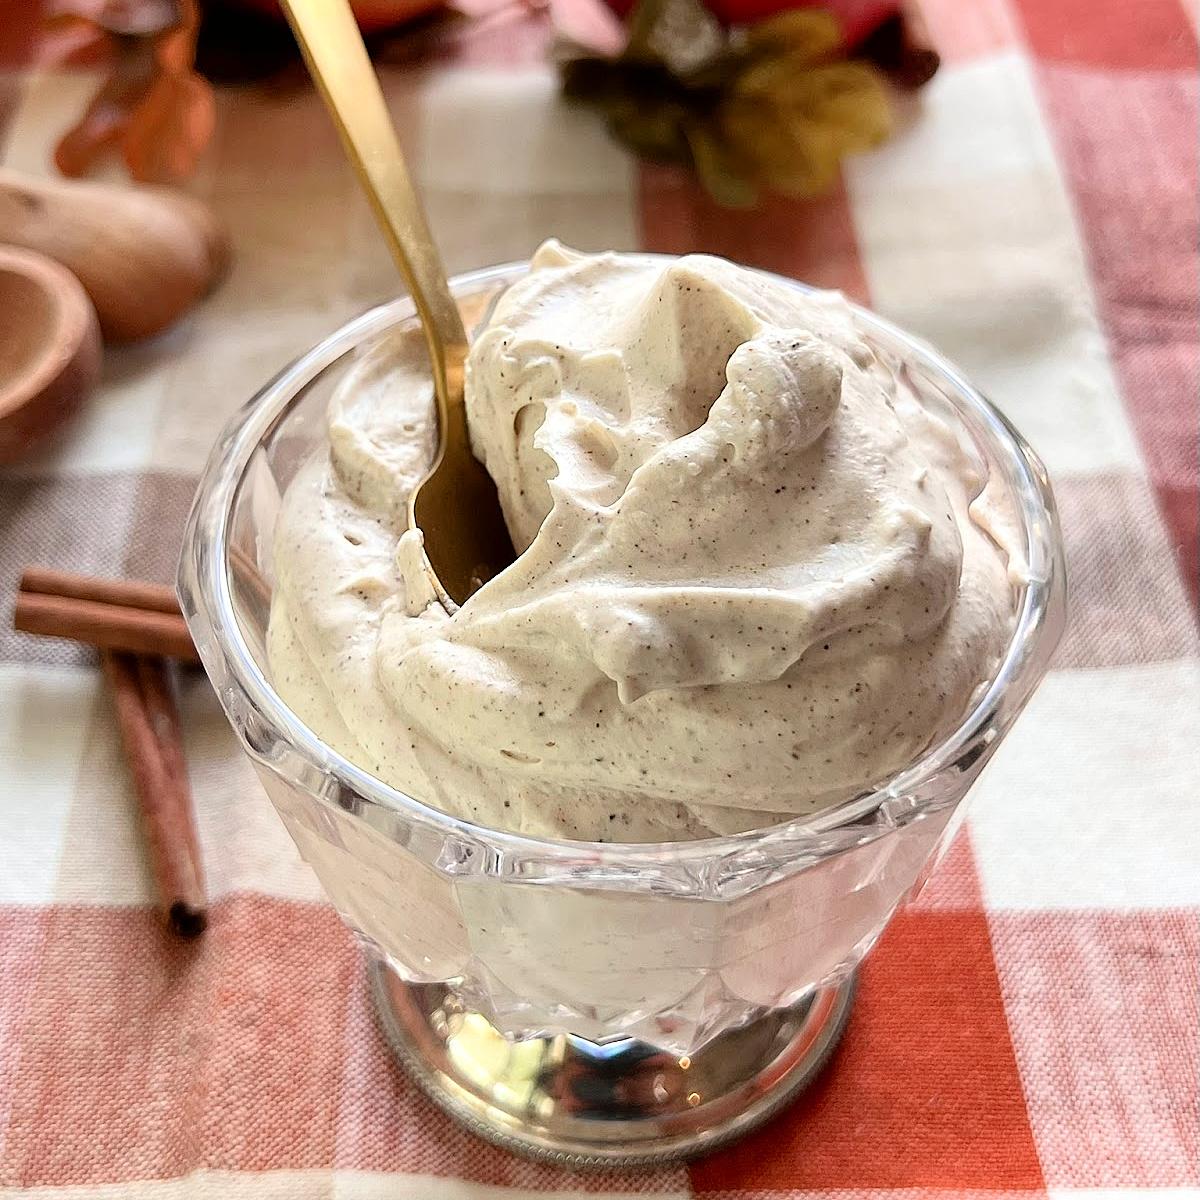
- Marshmallow crème. This gives the filling that iconic, marshmallow-y flavor and texture. You can always skip and fill with a regular vanilla buttercream or your favorite frosting, but it won’t quite be the same.
See recipe card for quantities.
Instructions
Make the Vanilla Bundt Cake
First preheat the oven to 325°F. Prepare a Bundt pan by spraying with non-stick cooking spray or brushing with melted butter and dusting with flour. Set aside.
Tip: Bundt pans are notorious for making cakes stick! The intricate shape of Bundt pans can make it easy for baked cake to get stuck (and consequently, fall apart). This non-stick cooking spray works really well to ensure that your cake will slide out.
Next, stir together flour, baking powder and salt in a medium bowl.
In the bowl of a stand mixer (or a large bowl) beat together butter, vanilla extract and vanilla bean paste (if using) until smooth. Slowly pour in sugar while the mixer is running and combine until the mixture is light and fluffy.
Add the whole eggs, one by one, beating after each addition, then add the egg yolks doing the same. Stream in the vegetable oil and beat until incorporated.
Carefully add 1/3 of the flour mixture to the wet mixture and mix until it is just combined. Add 1/3 of the buttermilk, and mix until incorporated. Continue alternating until all of the flour and buttermilk is added.
Mix until just smooth and incorporated.
Pour or spoon batter into prepared Bundt pan evenly. Smooth out the top. Bake for 60 to 70 minutes or until the top is golden brown and a skewer or knife inserted in the center comes out clean.
Note: Bundt cakes can take a long time to cook all the way through, so be sure to test with a long skewer in the center of the cake area to ensure that it doesn’t come out wet. You may need more or less time depending on your oven.
Remove the baked vanilla Bundt cake from oven and allow it to cool for about 30-45 minutes to an hour before attempting to fill or remove from pan.
Tip: There have been many a Bundt cake casualty from impatient bakers trying to flip over a still-warm Bundt. It is VERY important that you wait until the cake has cooled and set before you remove it or start carving into it, otherwise, you may end up with a big crumbly mess.
Make the Marshmallow Crème Filling
In the bowl of a stand mixer, beat the butter, marshmallow crème and vanilla extract together until well mixed. Transfer the mixture to a piping bag with a round tip, or a zip top plastic bag with one corner snipped.
Assemble the Twinkie Bundt Cake
This cake isn’t hard to assemble, but it can be messy. Do yourself a favor prepare to assemble this cake over a baking pan or a kitchen towel to avoid getting crumbs everywhere.
There are two methods for creating the tunnel of marshmallow crème in this Twinkie Bundt cake:
Method 1: Create 6 or 7 deep holes in the bottom of the cake (the top before it is flipped over out of the Bundt pan), being careful not to poke all the way through the cake. You may need to find a tool to help clear the crumbs out of the holes or carefully turn the pan over to allow the crumbs to fall out so that the holes are ready to fill with frosting.
Once the holes are made, pipe the marshmallow crème frosting into each hole, squirting the filling in until you get some resistance. (Don’t overdo it because overfilling can crack the cake.)
When finished filling, place a serving dish on top of the Bundt pan and give it a flip (a little prayer here doesn’t hurt); the cake should come free from the pan and be sitting pretty on your serving dish.
Method 2: Slice the cake in half just like you would a layer cake. Place the bottom half of the cake on a serving dish. Carefully carve out a little bit of cake from the top and bottom pieces (like you would hollow a bagel).
Fill the hollowed “tunnel” with frosting and carefully place the top layer of cake on the bottom layer.
Dust the whole Twinkie cake with powdered sugar before serving.
Recipe FAQ’s
Twinkies are a type of American snack cake made by Hostess Brands. They are light and spongy vanilla cake with a crème filling.
Twinkie Bundt Cake can be covered and stored at room temperature (as long as it isn’t too hot in your kitchen) for a few days, or covered and refrigerated for up to a week.
Yes. Cake tends to be fragile and crumbly when it is warm. Attempting to remove it from the pan to early can result in quite a mess! Let it cool and set for 30-45 minutes before turning it out of the pan.
Variations & Substitutions
Want to try your hand at a different version of this cake? How about:
- Change the flavor of the filling! Add in some pulverized freeze-dried strawberries or raspberries for a fruity marshmallow frosting.
- Add sprinkles to the filling for a festive twist. (Just make sure they’re small enough to pass through the piping tip.)
- Add mini chocolate chips to the Bundt cake batter before baking for a chocolate-studded version.
I wish I could share gluten-free or dairy-free/vegan substitutions for this recipe, but I haven’t tested it and making substitutions in baking can be super tricky! I do think a 1 to 1 gluten free flour blend could work, but I am not entirely certain.
If you do try this recipe with your own diet-specific subs, would you please report back? I appreciate it!
Homemade Twinkie Bundt Cake

52 comments
Mary
This cake is always a fun surprise to serve to guests!
thekitchenprep
Agreed! Who doesn’t love being surprised by hidden marshmallow crème frosting!?
Mary
I made a cake like this years ago using a chocolate filling. To fill the cakecut a slice off the BOTTOM of the Cate. Using a spoon, hollow out the center of the cake. Place the filling in the channel you made. Replace the BOTTOM slice. Invert on to the serving platter. Enjoy.
thekitchenprep
Lovely, Mary! Thanks for sharing!
wanda
How about splicing the cake in half add the marshmallow
thekitchenprep
You could do that, too! Again, it would be more like a regular layer cake instead of a “tunnel” like a Twinkie, but it should still taste great.
Kaitlyn
I have this in the oven right now, would it be best to let cool entirely in the pan and then digging the frosting tunnel while cake is still in pan?
thekitchenprep
Hi Kaitlyn, You could certainly try! My only concern would be trying to turn the cake out of the pan once you’ve dug the tunnel might affect the structure and stability of the cake since its tender. Let me know how it turns out!
Marji
I took a Wilton Cake class years ago and the secret to getting the filling into a cupcake or cake is to push the piping tip into a very warm cake and squeezing the frosting in. When a cake is hot it will expand when the filling is pushed into it. Worked when we did this in the class, don’t see why this won’t work with this. Thought I would share.
thekitchenprep
Very interesting! Wouldn’t the hot cake melt the frosting though? I’ll have to try this one day! Thanks for the tip!
Marna
My even easier way to get the filling in place!! Carefully, using a serrated knife or dental floss, cut off the bottom 1/4 to 1/2 inch of the cake and set aside. Then scoop out your tunnel with your fingers and/or a fork. Fill the tunnel with the ooey gooey cream and place the bottom back in place. Don’t worry if it has cracked or broken, it’s on the bottom once the cake is flipped over and no one will notice.
Place your serving dish on the cake and flip them over. Voila!!! Perfect tunnel of yummy love surrounded by cake. Try this with your favorite chocolate bundt recipe to make a ding dong cake. Just have to pour a little ganache over the top for chocolate icing. YUUUM
thekitchenprep
Thanks, Marna! Sounds like a great alternative to excavating a cake tunnel for those who don’t want to take on the task. 🙂
Cheryl Phipps
I LOVE your cake plate. Where did you get it? Thanks.
thekitchenprep
Hi Cheryl, I bought this cake plate years ago at Target! It was also a chip/dip server when you flipped it over. They probably don’t have the same one, but I’d check around the springtime to see if they have something similar. Target never disappoints! 🙂 Thanks for stopping by!
Valerie Kellner
Thanks for sharing this recipe! One of my favorite ways to make strawberry shortcake is with twinkies…. this will be so much better, by itself &
with fresh strawberries! ?
thekitchenprep
@Anonymous – I haven't made this recipe in a while, but I don't remember the batter being unusually runny. Did it turn out ok after baking? Hope the recipe came together for you!
Anonymous
The batter is very runny, is it suppose to turn out like that?
thekitchenprep
@Karen Baker – Thanks for sharing your filling strategy! I'm all for anything that avoids a mess and makes it easier! Glad it worked out for you, hope you enjoyed the cake. 🙂
KAREN BAKER
Ok, so here's what I did, that I thought would make the assembly easier… I poked holes in the cake while it was still in the pan, I then inverted the cake onto a cooling rack. When the cake was completely cooled, I inverted it back in to the cold pan, using the pan as a secure holding area while I filled the cake holes. I used a 3" long filling tip and filled all the holes nicely. I then inverted the cake onto a cake plate. Voila!!
Gloria
Thanks m trying that next time!
This cake is wonderful!
thekitchenprep
@Amy – I think it would be fine at room temp for a day or so, but I'd refrigerate it if it's going to be an extended period of time before it's consumed. {I tend to err on the side of caution when it comes to food safety!} Just make sure to bring to room temp before serving.
Amy
Does this need to be in the fridge if not served right away?
Janice Bates
Just made this…beautiful and my son loves it, especially the filling!!!!
Yadira
looks sinfully delicious!
thekitchenprep
@Sarah – The best scene ever! And yes, make this happen! You won't regret it. {Unless you try to eat it all by yourself.} Enjoy!
Sarah Ochocki
"Oh… It's a KEHK!
…There's a hole in this kehk."
I love that movie and this Twinkie monstrosity looks like something that needs to happen to me, please and thank you.
thekitchenprep
@Anonymous – Hi there! I can see how that sounds confusing. I used the apple corer to create a few vertical "wells" from which to dig the tunnels, making sure not to go all way through the top of the cake. I stuck my fingers into each well and then "dug" horizontally between them to connect the tunnel holes throughout, creating a hollow area for the filling. The wells also allow for a place to scoop out the cake as you make the tunnel. I hope that makes more sense!
Anonymous
I am having problems understanding how to dig the tunnel thru an apple corer. The tunnel is certainly bigger then an apple corer hole – I know you used two fingers, I think. Did you stick two fingers down the apple corer hole to dig the tunnel?
thekitchenprep
@Natalie Reilly – I haven't tried it as a cupcake recipe, but I think it would work out! My only concern would be that the texture is a bit more dense than a traditional cupcake, but if you're ok with that then I say go for it! 🙂
thekitchenprep
@I Love Bundt Cakes – Thanks for giving it a try! Glad you enjoyed it! Yours looks great as well!
Natalie Reilly
This looks and sounds delicious! Just wondering if you've tried the cake recipe as cupcakes, and if so, whether it came out with the right consistency. Thanks!
I Love Bundt Cakes
We made this Bundt but with strawberry flavor, so yummy!!! Thanks for the recipe!!!
You can see it in our blog I love Bundt Cakes.
thekitchenprep
@Pamela Jern – You could certainly do it that way, but then it would be more like a regular vanilla cake than a "Twinkie". The tunnel of frosting is what makes it unique, but it would be delicious either way!
Pamela Jern
Cut the cake in half,spread the filling over it,put top back on. Save yourself a lot of work.
Keilas Macarons
Hobby Lobby and Michael's has vanilla bean paste for 6.99. That is where I get mine.
thekitchenprep
@ Christina & Rebecca – I bought mine from HomeGoods, but they don't always have it. Most specialty stores {like Williams-Sonoma & Sur La Table} carry vanilla bean paste. If you can't find it, you can simply scrape out the seeds from 2 vanilla beans or omit it altogether and just add another teaspoon of vanilla extract.
Genie
Walmart has vanilla bean paste. It’s with the Wilton cake decorating items. It’s the exact one I was buying from the kitchen gourmet stores but it’s $3. cheaper at Walmart.
thekitchenprep
Good to know, Genie! I’ve never seen it at our Walmart but it’s worth taking a look. Thanks for sharing the info!
Christina & Rebecca
Where can I get the vanilla bean paste from?
thekitchenprep
@Susie Saga – Hi Susie, You can make your own marshmallow creme using a recipe like this: http://www.brighteyedbaker.com/2013/03/15/diy-marshmallow-creme/ Or you could just use your favorite buttercream filling in place of the marshmallow type! Hope it turns out great!
Susie Saga
we dont have marshmallow paste in the philippines…what can you suggest i would do wt the lack of the marshmallow paste? i want to try this recipe…i love baking n baking each day….
thekitchenprep
@mrs.chelle – Yes! 1/2 cup, 8 tablespoons, 4 oz… I'm terrible about specifying because I always have the 1/2 cup sticks on hand. Thanks for calling me out! 😉
Rose
So what is the gluten-free equivalent of cake flour?
thekitchenprep
Hi Rose, I can’t vouch for this flour blend since I haven’t used it myself, but I just found this recipe for homemade gluten free “cake flour” — http://www.foodnetwork.com/recipes/articles/gluten-free-pastry-flour-mix
Hope that helps! If you use it, please report back and let us know!
mrs.chelle
In the frosting it calls for a stick of butter are you referring to a half cup size?
dina
what a great idea. i love the filling!
Alice // Hip Foodie Mom
Dianna, love this cake!!! I haven't read Pure Vanilla yet but will check it out! Did you ever get my response to your email a few weeks ago? Just wanted to make sure it went through! take care!
thekitchenprep
@Allie – Thank you! Doesn't vanilla bean just make everything even better?? 🙂
@Jess – I suppose one Twinkie is one serving… so one Twinkie cake should be the same, right? Gosh, we should have majored in logic. 😉
Jess @ On Sugar Mountain
Though I'm sorry the original recipe didn't work out, can I say I am SO excited that this twinkie cake came to us instead! Is it bad if I eat the whole thing on my own? I mean, it's sort of just one giant twinkie…it can't be THAT bad, right? 😉
Susan
I was looking for a Twinkie filling to fill some cupcakes quickly for my little granddaughter a surprise treat before she came by. I must say this Twinkie filling is the best stuff ever!! I had a jar of marshmallow fluff I had picked up at World Market so I used that and man that stuff in this recipe is bomb!!
Thank you SO much for this delicious recipe…now I must try your cake too. Wonderful Twinkie filling!
thekitchenprep
Oh that’s wonderful! Hope your granddaughter enjoyed it and that you love the cake just as much as the filling! 🙂
Allie BakingAMoment
Omg! This cake looks exactly like a twinkie! Only better because it's homemade 😉 LOVE those vanilla bean specks!